
First draft editing: Posting comments
Comments are my post-it notes
This blog post is one of a series about how you might process your first draft. Many of the features are also useful later in the editing process!
Why post comments in Scrivener?
While reading or listening to your first draft, it’s impossible – at that precise moment – to fix everything that you realise needs attention. Instead, you need to leave yourself messages and come back to this problem at a later date.
The comment option is – I think – the easiest of the various messaging options within Scrivener.
- If you are using Scrivener 2, I explain how comments work in this blog post.
- If you are using Scrivener 3, it’s a similar process, but not quite the same; so I’ll explain it here.
How do I use the Comments feature?
When reviewing my first draft, I leave myself messages by posting comments but comments are also useful at later stages, too.
When you begin to receive feedback – eg from your editor, your beta readers and maybe members of a writers’ group if you tend to share your writing in this way – you can make a note of who said what about various sections of text, or your manuscript generally.
After I’ve edited my first draft, I share my chapters with the Ria View group, one chapter per meeting. Whatever feedback I receive about a chapter (say chapter 2), I note these comments and bear them in mind when I’m preparing subsequent chapters.
But I do not go back and fix earlier chapters or, indeed, that particular chapter. The editing can wait until the whole book has gone through this review stage.
What are comments?
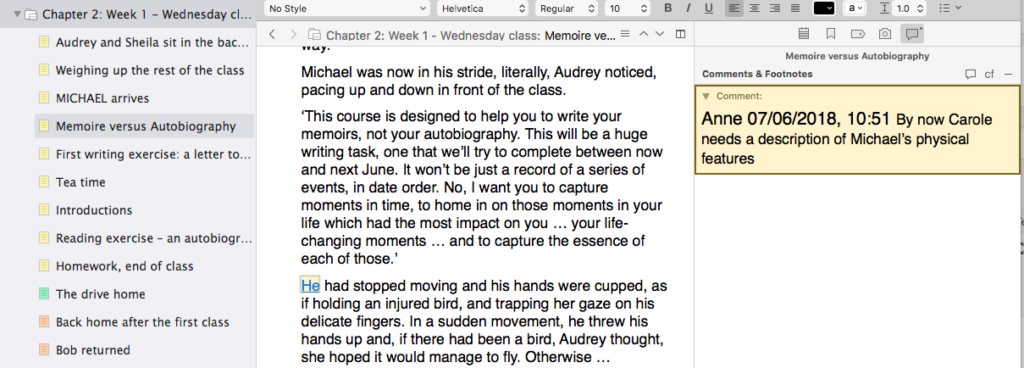
Comments are messages you can leave for yourself, that are linked to a word (or phrase or larger section of text) but appear in the Comments & Footnotes area of the Inspector.
So, unlike Annotations, which appear within the text itself, or Footnotes and Endnotes which are expected to appear on the page eventually, Comments are a separate feature.
Comments are temporary!
Like post-it notes: destined to be processed and then binned.
Comments are dated
If you are working with others, these comments can provide an audit trail of discussions about the revisions being made. For example, you could record what the editor suggested. Later, you might ‘reply’ explaining what you did as a result.
How do you create a comment in Scrivener 3?
Position your cursor where you want the comment to be, or highlight the relevant text.
If your Inspector is open:
 Click on the speech bubble (at the right-hand end) to show Comments & Footnotes
 Click on the next speech bubble
- Type in your comment against the date stamp
If the Inspector is not already open, you could open it and proceed as above. Or:
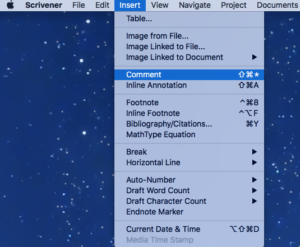 Select Insert / Comment
- The Inspector opens for you and the comment is ready for you to type
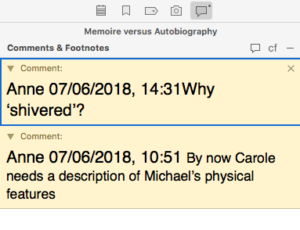 What to note about Comments!
- Each time you insert a comment, the text in the Editing pane that is attached to that comment is highlighted with a yellow rectangle.
- The comments appear in the same order as the highlighted text appears; they run parallel – not according to the date you entered them.
- If you click on a comment in the Inspector, the cursor in the Editing pane jumps to the relevant highlighted text. You do not have to search for it!
- If you click on the highlighted text in the Editing pane, the relevant comment is highlighted (and the Inspector will open for you if it was not already open).
- In the Inspector pane, an asterisk above the speech bubble indicates the existence of comments.
- The X in the top right of the comment box itself is your route to deleting the comment (once you’ve processed it!).
Exporting comments via Compile
It’s assumed Comments are not to be exported. However, if you want to see them on the page, you can overrule the default.
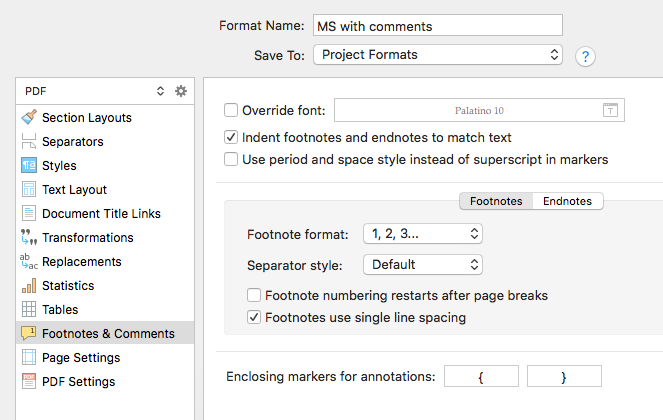
- Set up a Project format- I’ve called mine ‘MS with comments’.
- Click on the cogwheel and untick the ‘Remove comments’ option.

When you Compile, the linked text is highlighted and the comments are embedded alongside that highlighted text.
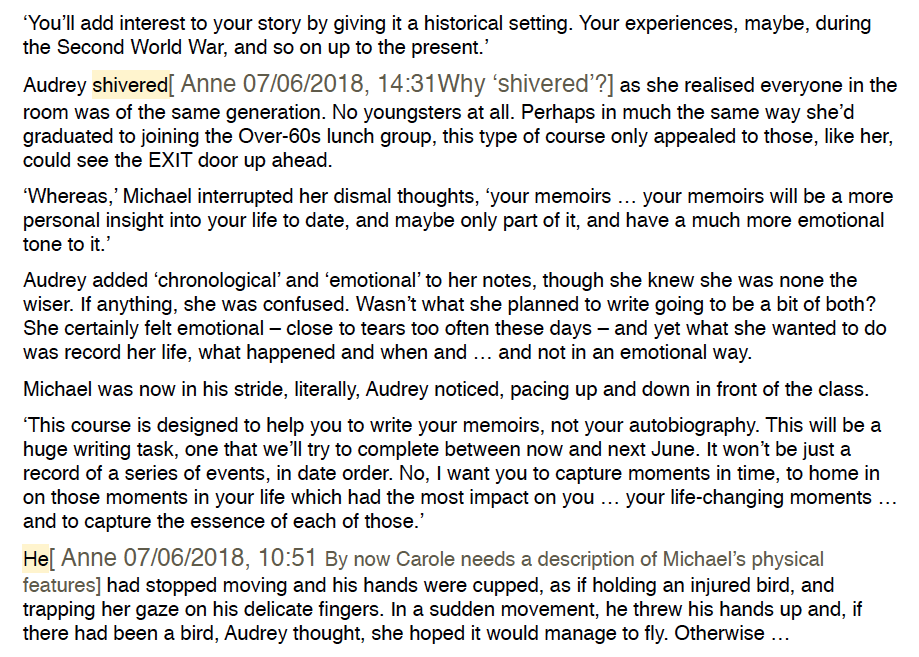
Mine are shown within square brackets [] as that’s another Scrivener default. If you’d like something different for these ‘enclosing marks’, select ‘Footnotes & Comments’ pane for your project style and enter your preferred characters.
Questions about Comments? Need a helping hand? Want a demo?
To watch me go through the process of leaving myself messages using the various Scrivener features or to ask any questions, book a Simply Scrivener Special.
To help me to prepare, you could also complete this short questionnaire.
The ScrivenerVirgin blog is a journey of discovery:
a step-by-step exploration of how Scrivener can change how a writer writes.
To subscribe to this blog, click here.
Also … check out the Scrivener Tips
on my ScrivenerVirgin Facebook page.


Jerry Nelson
26 January 2020 at 08:19January 26, 2020
To the best of your knowledge, has the latest (Version: 2.9.0.35 Beta (809515) 64-bit – 19 Jan 2020) changed the way comments behave?
As a ghostwriter, I leave comments/questions/etc for the client — and have been doing this for several years.
I compile to Word and upload to Google Docs. The comments have always stayed with the document during the trip.
Until today.
The comments disappear in the Scrivener compile function. They remain visible in Scrivener, but disappear and don’t show up in the Word doc.
I wonder if this is a new bug?
Thanks!
Anne Rainbow
26 January 2020 at 08:29I’m an a Mac, Jerry, so I steer well clear of the PC/Windows issues. However, a) it could well be a bug – there have been so many – or b) the settings may have changed. On a Mac, you have to choose to export Comments; the default is not to do so. Maybe this has become a default on the PC/Windows beta version too?
Jerry Nelson
26 January 2020 at 08:32Yeah, well, thanks. I thought of that and double checked the settings, but no — the hide/erase comment selection is unchecked.
In other words, I’ve got Scrivener set up to export the comments.
Ah well. The search continues, but thanks!
Maria Smith
18 June 2018 at 12:32What a good idea, and thank you for posting details for both versions of Scrivener. The screen shots are really useful too.