The Developmental Editor’s toolbox
 Editor’s feedback – the Scrivener way
How do you, a professional editor, provide feedback to your writer client?
Some time ago, I outlined my developmental editing process in this blog post.
My developmental editing feedback process
To recap: When a writer sends me their manuscript as a Scrivener project file, my role is to read it and provide feedback, whatever stage they have reached.
I’m not copy editing, or line editing, but providing advice on how best the writer can make progress on their manuscript.
There will be a time limit (based on what’s been agreed between us) so I read as far as I can and use a range of Scrivener tools to provide feedback:
- Revision mode
- Annotations
- Comments
- Collections
- Colour coding
My aim is to identify as many issues as possible – but not necessarily every instance of them. In addition, my feedback needs to be helpful – and not overwhelming. Too often I read on social media reaction from writers like this.

I want writers to look forward to receiving feedback from me. I don’t want them to be dreading it or the tasks that follow!
Using Scrivener for developmental editing feedback
In that previous blog post, I promised to give examples of the Scrivener tools that I use for developmental editing – and to explain how professional editors could make best use of them too. So, here are the examples I promised, together with illustrations of how I give feedback, without overwhelming my writers.
Revision mode
Revision mode allows me to insert words and punctuation as necessary. I explained the process in this blog.
I use revision mode solely for suggestions which I fully expect the writer to accept.
- Corrections to grammar eg wrong tense
- Corrections to capitalisation
- Corrections to punctuation
I do not use revisions for suggestions which require the writer to decide on a different wording, or to use their own judgement.
This makes the task of processing the revisions as simple as possible for the writer.
I do expect my writers to become familiar with Revision mode. It’s such an important feature of the communication between us. So, they should have read the blog post already, and may well have attended a Simply Scrivener Special where I’ve explained it and answered questions about it for those present.
Every time I work on a manuscript, I report back to the writer.
- Sometimes, this is in a covering email.
- Sometimes, it is with the JUST US! Facebook group that the mentee and I use for private communications.
- It can also be within the Scrivener project itself.
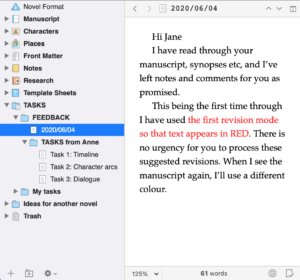
When the writer receives my feedback, they can scan through the manuscript in the Editing pane, and decide whether they are happy with my revision suggestions.
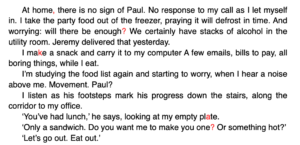
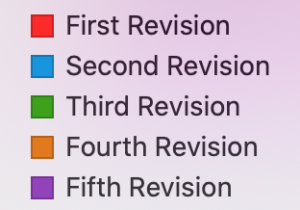
Notice that, within the text itself, the revisions appear in whatever colour I’m currently using.
Before I send the manuscript back to the writer, I change the Revisions mode to None. Otherwise, as soon as they start typing, it will all be in red (or whatever colour I’d chosen) and they will most probably panic!
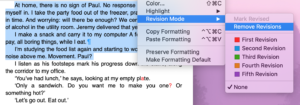
If they are happy with all of the suggestions in the manuscript, they select Format / Remove All Revisions.
Alternatively, they can highlight the text they’ve checked, and select Format / Remove Revisions.
It’s most unlikely that I’ll see a manuscript as many as five times but, if that happens, I’ll warn the writer when they receive my fifth revisions that they really do need to process the red ones before they send their Scrivener project to me again.
Annotations
I use annotations to highlighting material that I believe could/should be cut. As with the Revision mode, I use this tool solely for suggestions which I fully expect the writer to accept. They do, however, as with revisions, have the option to reject my suggestions. It’s a ‘yes’ or ‘no’ decision for the writer.
In this example, the word ‘only’ can be deleted without changing the sense of the sentence. It’s a wasted word.
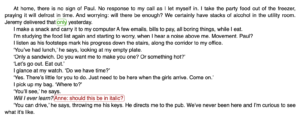
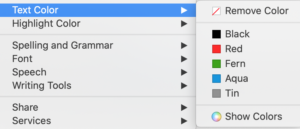
Whatever colour the writer might have used for annotations, I choose a different colour. In this example the writer is using red (the default), so I highlight the word ‘only’, apply Annotation mode and then right-click to choose the colour I want to use during this developmental edit.
If the writer hasn’t actioned these by the time I see the manuscript again, I choose a third colour and so on. As with Revision modes, if it seems I am going to run out of colours, I warn the writer to action my previous suggestions before sending me the manuscript again!
NB Before I send the manuscript back to the writer, I change the annotation colour back to whatever colour they were using …
For more information on Annotations: read First draft editing: Annotations (blogpost June 2018) and Messaging in Scrivener: 1 Annotations (blog post December 2016).
Comments
For nearly every other suggestion I feed back to the writer, I use the Comments feature. These appear in the Inspector and the text related to a comment is highlighted in the text (in Scrivenings).
For more information on Comments, read these blogposts: First draft editing: Posting comments and Messaging in Scrivener: 3 Comments.
The comments I leave for my writers often relate to an annotation/message left for me by the writer as in this example. As part of the developmental edit, I respond to all such questions, even if the writer hasn’t addressed them to me specifically.
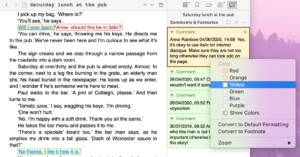
Notice that the writer has been using green for comments, so I change mine to yellow for this round of developmental editing.
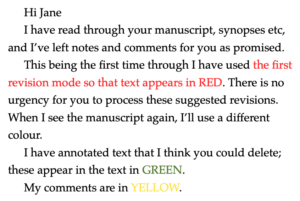
I remind the reader of my colour choices in my feedback note.
Collections
Collections result from a Search, and Scrivener has great searching capabilities. As a writer, I use them during the editing phase – see this blogpost for more details.
While developmental editing, I often create collections to help the writer to find instances of material that warrant their attention.
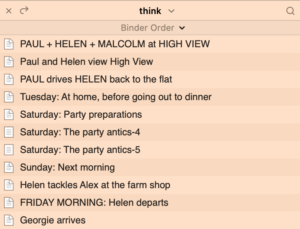
For example, many writers overuse some words. Repeats definitely need to be investigated.
- If they are local (ie just in one scene), I will colour code the repeated words – as in ‘things’ or ‘back’ in the screen grab below – and maybe leave a comment.
- If it looks like this is an issue that might affect all scenes, I set up a collection. This writer (me in this example!) is using ‘think’ a lot. I would then include ‘Consider your maybe excessive use of ‘think’ as seen in the collection I’ve created for you’ as one of the three tasks for this round of review.
Because collections are dynamic, if the writer fixes this ‘problem’ but then uses ‘think’ in a new scene, that scene will appear in the collection. Next time I see the manuscript, I will check all collections, and remind the writer if necessary to revisit the various problems once more.
Colour coding
Colour coding is an easy way of drawing attention to words that the writer might need to change. While developmental editing, I don’t offer suggestions as to what alternative words might work. That’s the responsibility of the writer. The fact I have coloured them is a signal that these words require attention.
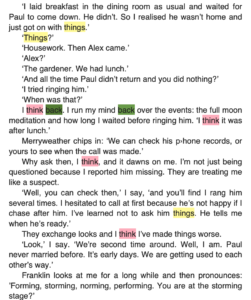
I choose random colours, but apply the same colour to the repeated words. Some manuscripts soon look like they have a case of measles!
The writer can remove the colouring and reword as they wish, in their own time.
Any questions? Need a helping hand?
To watch me using any of these developmental editing tools or to ask any questions about Scrivener, book a Simply Scrivener Special.
To help me to prepare for the webinar, please also complete this short questionnaire.
The ScrivenerVirgin blog is a journey of discovery:
a step-by-step exploration of how Scrivener can change how a writer writes.
To subscribe to this blog, click here.
You can also find links to blogs of specific topics in the Scrivener index.
Also … check out the Scrivener Tips.


Pingback:Scrivener Advent Calendar: C is for ... - ScrivenerVirgin
3 December 2024 at 16:21