
Inspector skills: Metadata
 Metadata is data about data
Metadata offers a way of documenting your manuscript: powerful for editing – I refer to metadata as the Editor’s Friend in this blogpost – but it’s also useful when you are writing that first draft – or during the planning stages.
Note that I write in scenes – part of the story that happen at a place, at a time and involves a subset of the cast of characters. So, for me, a document equals a scene. And a folder equates to a chapter.
What metadata is available?
There’s a long list!
- Project properties
- Title
- Synopsis
- Label
- Status
- Keywords
- Custom metadata: text / checkbox / list / date
Some of these metadata options provide an opportunity to record information about the entire manuscript, a document (ie a scene) or a folder (ie a chapter). Others offer options for categorising your scene/chapter.
Why use metadata at all?
Apart from keeping a record of aspects of your plan, using metadata opens up the options to use other powerful Scrivener features.
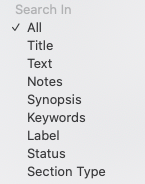 Scrivener’s search function includes the option to search in the metadata, rather than the manuscript itself. So, with an appropriate choice of metadata, you can create a collection of scenes that match a category of interest eg all the scenes which touch on the theme of divorce.
- Scrivener features like the thread view on the corkboard provide a visual overview of the structure of your manuscript, categorised by Label. This blog post explains more.
Metadata is entered once (and there’s usually a choice of where) but is then displayed in many places. So, for example, if you prefer to outline using the Corkboard, most of the metadata is accessible through that view as well as in the Outliner.
Scrivener also provides great flexibility.
- You can customise the metadata names. For example, you could rename the Label and Status field titles as POV (point of view) and Location, if that’s what you’ve decided to record in these fields.
- Where Scrivener provides colour coding (eg for Label, Status and Keywords), you can choose your own colours.
- Where Scrivener provides a field with categories (eg Label, Status, List), you decide the text for the categories.
This blog post considers when you might use each feature – and guides you in how to decide which will serve you best.
When should you create your metadata?
There is no schedule!
- Pantsers are free to write a novel with no metadata, and only go back and document their scenes when the editing starts.
- Planners might prefer to set up some metadata before they begin writing.
It’s up to you … You might also re-purpose a metadata item.
- During writing, you might use the Status field to record the location for each scene.
- When editing, the Status field might be used to record the progress of each scene through your editing/review process.
How to record data about your project
First, let’s consider what basic information you might include in your documentation. A simple matter of adding text … somewhere other than in the manuscript itself.
Project properties
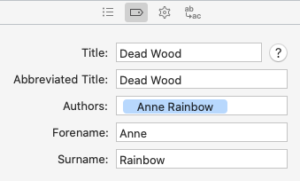
The main properties of a project are its title and the author’s name. Specifying these allows you to use this data (consistently) eg in headers/footers, on the title page, etc. This blog post explains how.
Where are the project properties?
The project properties are in Compile, the ‘set metadata’ pane.
Title
Each folder and document has a title. It’s up to you whether these appear when you output your manuscript and your decision will depend on what you are writing.
For non-fiction:
- The titles would be the headings of chapters, sections within chapters and subsections within that.
- Chapters titles will need to appear on the page, but auto-numbering of the chapters can also be achieved – see this blog post.
- Section and subsection titles would need to appear on the page and should be formatted in Compile. You will need a different section types for each level so that, for example, the point size can made smaller for the subsections than that used to the section headings. If you are new to Compile and/or section types, read my series of blogposts on Compiling – starting here.
For a novel:
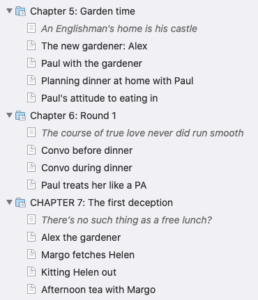 In a novel, the titles of documents (your scenes) will not be seen by your reader but you might benefit from seeing them on screen and on the page. This blog post explains more.
- When planning a novel, the title for each scene can serve as a reminder to you what that scene is about. The synopsis (see below) adds more flesh, but the title can serve as a prompt when the time comes to write that scene.
Where are the titles?
The titles can be seen (and amended) in many places.
- In the Binder, titles of folders and documents appear within the Manuscript (or Draft) folder. You can expand the Binder (using Cmd + 9) to see more detail, or collapse it (Cmd+0) to see less.
- Within the Editing pane, the title of the selected folder or document appears at the top of the pane, regardless of which View Mode you’ve chosen.
- If you choose Scrivenings view for the Editing pane, and select View / Text Editing / Show Titles in Scrivenings, the titles of the folders and documents will appear within the Editing pane ahead of the text that is in that folder/document.
- If you choose Corkboard view, the titles appear at the top of each card.
- If you choose Outliner view, the titles appear within a column called ‘Title’.
- Within the Inspector, in the Notes pane, the title of the selected document or folder appears at the top of the pane, within the Synopsis section.
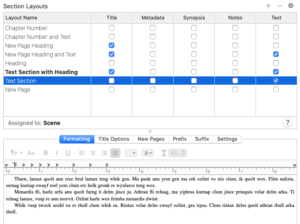
When you Compile, ticking the Title box will result in the title being output. So, I would not tick that box for my section type ‘Scene’, unless I wanted to print out an outline with just my titles and synopses. See this blog post for details on how to do that.
Synopsis
The term ‘synopsis’ may be used to describe an overview of an entire book. In Scrivener, the process of building/writing that full synopsis can be made easier by using the same approach but at lower levels.
 For each scene (document), record data that shows why that scene is included, what action happens, what ‘news’ the reader receives.
- Once you’ve grouped scenes into chapters (folders), reviewing those scene synopses gives you a good basis on which to write a chapter synopsis.
- Once all the chapters synopses are written, the creation of the full synopsis should be easier.
The Save the Cat ! Writes a Novel book explains ‘how to write killer loglines and dazzling synopses’. It depend on your identifying the component parts of your novel – the material which would appear in your chapter synopses.
Where is the synopsis?
When you select a folder or document in the Binder, its synopsis can be seen (and amended) in three places.
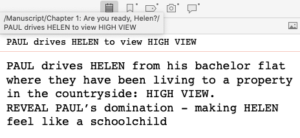 In the Inspector, in the Notes pane
- On the Corkboard, on the face of the card
- In the Outliner: an icon in the bottom right corner provides an option to hide/reveal the synopsis

Keywords
Keywords can be applied to a document/folder to label it in some way. Unlike the metadata features which categorise a document as belong to one of a set number of options (see below), you can apply as many keywords as you wish to the same document/folder.
Keywords therefore suit situations where a question can have more than one ‘answer’.
- Which character is in the scene? Answer: Helen, and Paul, and Georgie, and Malcolm
- What theme is addressed? Answer: Marriage, and Lying, and Control
Keywords also come with a colour coding option.
Where are the keywords?
When you select a folder or document in the Binder, its keywords can be seen in three places:
- In the Inspector, in the Metadata pane
- On the Corkboard, as coloured chips on the righthand side of the card if you choose View / Corkboard Options / Show
- In the Outliner: there is an option to hide/reveal each keyword, and a choice of text or a coloured block
This blog post explains how to set up keywords, how to assign colours, how search on them, and includes examples of how and where they appear on screen.
Custom metadata
Scrivener offers four types of custom metadata.
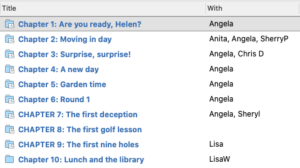 text
text- checkbox
- list
- date
Three of these provide an opportunity to document a scene/chapter.
- The text option can be used to record any message that applies to a scene/chapter. I use it to keep track of who has which chapters for review.
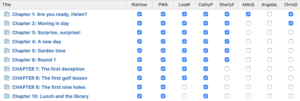
- The checkbox is a yes/no record for whatever purpose suits you. I use it to keep track of which review stages have been completed.
- The date (and time) options allows the creation of a timeline. This blog post explains how to achieve this effect.

 The list option is more to categorise the scene/chapter, so I’ve included this custom metadata option in the next section (see below).
Where is the custom metadata?
The custom metadata is visible in the Outline, if you tick the items you want displayed. Custom metadata settings can also be viewed the Inspector, in the Metadata pane.
How to categorise your documents (scenes) / folders (chapters)
Scrivener offers a number of metadata options which are ideal for categorising documents and folders.
- Label
- Status
- Custom metadata: list
If there is only one way to answer a question, then Label, or Status or List will provide a way for you to record this.
- Who has the point of view in this scene?
- Where is this scene located?
Label
The Label field comes with a colour coding option and the Corkboard has a Thread-by-Label option.
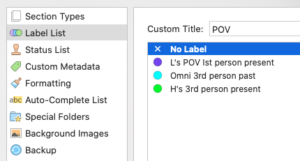
So, this is the ideal choice if your story is told from more than one point of view (POV).
If you have only one POV but your story involves intertwining two stories, one from the past and one from ‘now’, so as to enjoy the thread-by-Label option, the Label field might be used to identify the ‘back story’ from the ‘front story’.
Having decided what makes best sense for you, you can rename the ‘Label’ field with a more meaningful word.
Where is the Label?
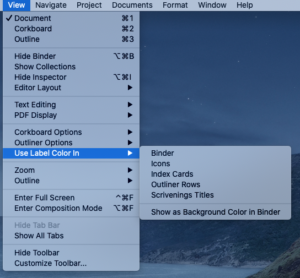
The Label setting colour can be seen in many places. first though, the icons in the Binder, and/or on the Corkboard, and/or in the Outliner, need to be set to show the Label colour.
- In the Binder, the Label colour is used for a circle to the right of the title.
- On the Corkboard, the Label colour is a strip on the left hand side of each card. You can also opt for the threaded view, which places the cards on a thread according to their Label. This blog post explains all!.
- In the Outliner, the Label colour is used to colour the whole row for each folder/document.
- In the Inspector, the Label is a drop-down at the bottom of the pane.
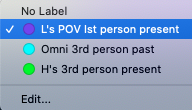
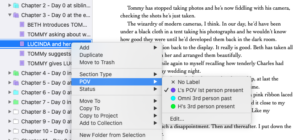 To set or change the Label, do so in the Inspector. Or, right click on the entry in the Binder and select Label (or whatever you have used to rename that field).
I’ve renamed mine POV as this novel has three different points of view. Renaming is done through the Edit option in the drop-down pane.
Status
The Status stamps comes with a colour coding option, and a Show/Hide option available in View / Corkboard Options. This blog post shows how.
Like Label, you can customise it to suit your own purposes. Call it whatever makes sense for you. You can also re-purpose it, for example, if you want to use it for one thing while writing and another while editing.
Where is the Status?
The Status appears in two places
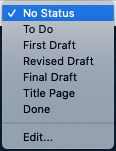 On the Corkboard, the Status Stamp appears diagonally across the card if you choose View / Corkboard Options / Show Status Stamps. You can control not only the text that appears but also its colour.
- In the Inspector, the Status is a drop-down at the bottom of the pane, to the right of the Label field.
Amending the status is the same as for the Label: in the Inspector. Or, a right click option from the Binder selection.
Custom metadata: list
The list option in the custom metadata pane provides a third way of categorising document/folders. Just as with Label and Status, you choose what to call the list, and the entries in the list. Each document/folder can then be assigned one of the items in the list.
Where is the custom metadata?
As with the other custom metadata items, the List custom metadata can be viewed in the Outliner, and in the Inspector in the Metadata pane.
How to decide which metadata option to use for what?!
Having seen the whole range, many writers still wonder where to start. Here’s my strategy:
- List the data you want to create for each document/folder.
- Split that list into two: items of information and categories
- For the categories, your choice is: Label, Status, Custom metadata (list)
- For the items of information, your choice is: title, synopsis, keywords plus the custom metadata (text / checkbox / date)
- Ask yourself where you want to see this metadata: Corkboard, Outliner, Inspector
- Allocate the most important data to the option that fits it best. And so on.
For example:
- Label for POV
- Status for progress
- Keywords for characters
- Date for timeline
Don’t try to use all of the metadata option in one hit. Adopt one, get used to it, see how useful it is to you. Adopt another … and so on.
Never forget that the main effort – and most of your time – should go into writing that manuscript!
Any questions about metadata?
To watch me using Scrivener’s metadata features or to ask any questions about Scrivener, book a Simply Scrivener Special.
To help me to prepare for the webinar, please also complete this short questionnaire.
The ScrivenerVirgin blog is a journey of discovery:
a step-by-step exploration of how Scrivener can change how a writer writes.
To subscribe to this blog, click here.
You can also find links to blogs of specific topics in the Scrivener index.
Also … check out the Scrivener Tips.


Pingback:Scrivener Advent Calendar: M is for ... - ScrivenerVirgin
13 December 2024 at 11:03