
Placeholders: Hierarchical autonumbering
 Autonumbering is a big topic. We already covered a lot in the previous two posts:
- The simplest options, plus subnumbering and numbering by page, in Placeholders: Autonumbering
- Restarting numbering, using and restarting named auto-numbering streams, and compound placeholders Placeholders: More on autonumbering
But, there are two more aspects to consider:
- Hierarchical numbering
- Making placeholders more readable
Both are also big topics, so here’s my take on the first one.
Hierarchical numbering
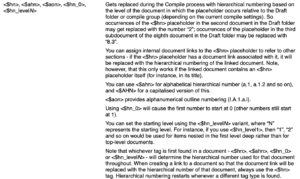
The entry in the List of All Placeholders (available via the Help menu) for hierarchical numbering is enough to put off any reader.
Let’s unpick this. There are three options and, in all three, the ‘h’ stands for hierarchical:
- <$hn> The n signifies Arabic numbering and every time the placeholder occurs, at Compile, it will be replaced by a hierarchical number based on the level of the document in which this placeholder appears, relative to the Draft folder. Or, if you are not compiling the entire Draft, it would be relative to the compile group you’ve specified.
- <$ahn> – as above, but the ‘a’ results in the highest level being alphabetical rather than numerical. Unsurprisingly, <$Ahn> results in the alpha characters being capitalised.
- <$aon> provides alphanumerical outline numbering (I.A.1.a.i). This gives five levels of ‘numbering’: Roman caps, Letters caps, Arabic numbering, Letter lower case, Roman lower case!
Successful use of hierarchical numbering will depend on how well your Binder is structured.
- The Nailing Your Binder post is worth a read.
- Also, since this is more likely to be used by non-fiction writers, read Scrivener for Non-Fiction Writers too.
Basically, because the numbering is hierarchical, where a document sits in the hierarchy determines its number.
- In the top (most left) level, each time <$hn> is encounters, the numbering is incremented: 1, 2, 3, …
- If the placeholder is encountered in the third subdocument of the eighth document in the Draft folder, the number will be 8.3.
So, to demonstrate how this works, consider this sequence of screen grabs. I set up my Binder to have five levels.
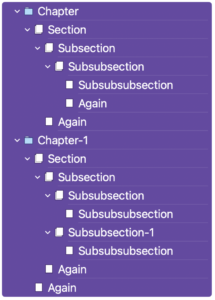
I set up section types to match. (This is as they appear in the Compile pane.)
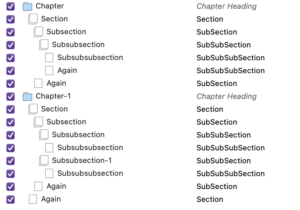
I then assigned section layouts to each section type. (For clarity, I renamed the section layouts to match the section types and deleted the default section layouts I didn’t need.)
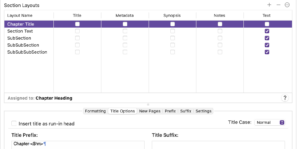
For each section layout, I used the <$hn> placeholder in the Title Options tab.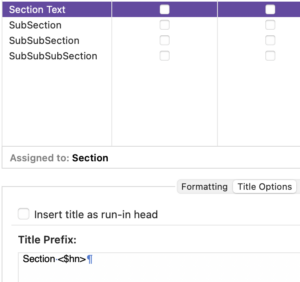
On the Formatting tab (not shown), I used centred text for the Chapter heading, but left aligned the Section title. I then went back to the Title Options tab and inserted tab jumps so the lower levels were indented.
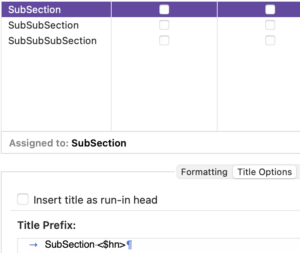
The lower the level, the more tab jumps: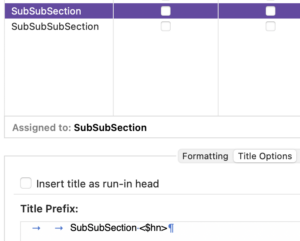
So, the lowest level had three tab jumps.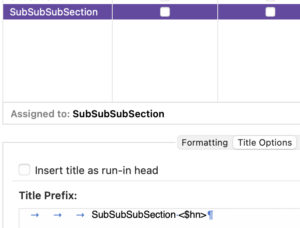
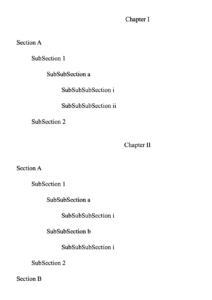
This is the auto-numbering that was produced.
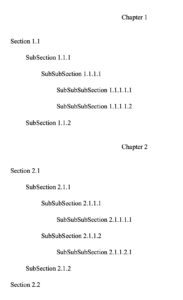
This example above shows how <$hn> works. If you replace <$hn> with <$aon>, this is the result.
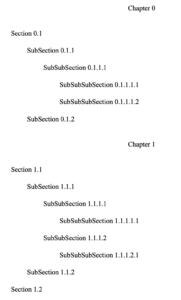
Starting the numbering at zero
It is possible to have the numbering start at zero: use <$hn_0>. The notes warn that ‘other numbers still start at 1’; and this refers to lower levels of numbering.
Changing the starting level
If you wanted the numbering to start at a lower level than the top one, use <$hn_levelN> where “N” represents the starting level. This might be useful if your Binder structure was in Parts, but you didn’t want them to be part of the auto-numbering system.
Restarting hierarchical number
Hierarchical numbering restarts whenever a different tag type is found.
The observant reader will notice I’ve left ‘assigning internal links’ for a rainy day blogpost. I think it will be best served with a reminder of linking in general … sometime in 2024.
Questions about Scrivener?
Need a helping hand with auto-numbering?
Want a demo? Book a Simply Scrivener Special session at a time to suit you.
And, if you need a steer on self-editing,
check out my RedPen Editing courses.
Join RedPen Editing for a free 5-day editing taster course.
Did you notice?
No adverts.
An uninterrupted read.
To thank me for posting this blog
and helping you, you could always
buy me a virtual cup of coffee!
The ScrivenerVirgin blog is a journey of discovery
To subscribe to this blog, a step-by-step exploration
of how Scrivener can change how a writer writes, click here.
Also … check out the Scrivener Tips
on my ScrivenerVirgin Facebook page.
Not yet using Scrivener?
Click here to download your free trial.




No Comments