
Structuring in Scrivener: Chapter titles and numbering
 Chapter titles and numbering!
Because Scrivener offers so much flexibility and gives you so many options to choose between, sometimes you may feel overwhelmed by it all. My advice is to leave the defaults as they are and, only if you feel the need to change something, should you start to explore what options are open to you.
So, let’s explore today’s topic: Chapter titles and numbering …
Chapter titles and numbering
Structuring in Scrivener is all about creating folders and documents, and one of the first decisions you’ll be making is choosing whether just to number your chapters or to have titles, or both, or neither.
It’s totally up to you, and, as a bonus, Scrivener offers to automate the numbering for you.
How to title your chapters
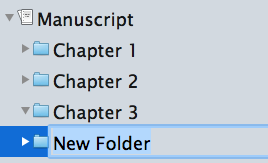
When you create a new folder for a new chapter, Scrivener labels it as ‘New Folder’.
While this dummy text is still highlighted in blue, you can type your chosen title. Here, I have called the chapters Chapter 1, Chapter 2, Chapter 3 and this next one is destined to be Chapter 4.
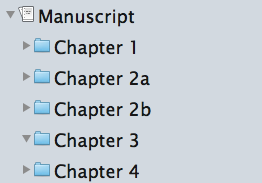
While I am writing my outline, I stick this simple system: 1, 2, 3, 4, …
If later, I decide a chapter is too large and I need to break it into two smaller chapters, I’ll retitle only those two. In the example, I’ve broken chapter 2 into two and called them 2a and 2b.
Won’t that look daft when the book is compiled? No …
No, because Scrivener gives you the option not to use your folder titles, and to use automatic numbering instead. So, I don’t need to spend precious time renaming all my folders whenever I make a change to the structure of my novel. I’m content with 1, 2a, 2b, 3, 4, …
How to control what appears as the title when compiling
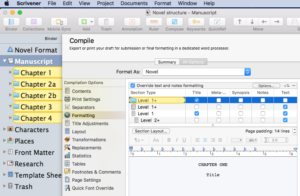 Notice that, when you select File / Compile and reveal the formatting tab, the column headed ‘Title’ shows a tick against the yellow highlighted Level 1+. This is the default option, which means (unless you change it) whatever title you used for your chapters will appear at the start of each chapter.
Notice also that, in the same row, there is no tick for ‘Text’.
For Level 2+ (my scenes), the ‘Title’ is unticked and the ‘Text’ is ticked.
(If you need a reminder about what these levels are all about, check out my blog post on Formatting levels.)
The default provided by Scrivener is therefore: to use the titles you choose for the chapters, but not for the scenes – and to output the text from the scenes, but not whatever titles you used for them.
When you think about this, it makes a lot of sense. However, you are in control and you can output whatever you wish!
Automatic numbering in chapter titles
 Notice, in the formatting pane, that Scrivener presents two lines of text: CHAPTER ONE and Title.
Again, this is the default, and you can change it if you wish. How?
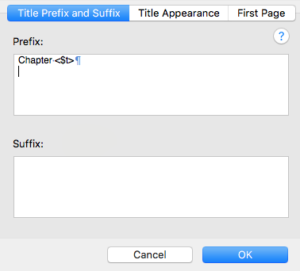 Clicking on the Section Layout… button opens up a window with three tabs. The first pane is the Title Prefix and Suffix pane.
For the Prefix, it displays Chapter <$t> and it’s the tag (the characters within triangular brackets) which determines that the word ONE (rather than the number 1, or the Roman numeral I) is displayed.
If you change the tag, you’ll see different versions of the chapter numbering. Selecting Help / Placeholder reveals the full extent of tags and, if you scroll down quite a long way, you’ll find the ones used to control automatic numbering.
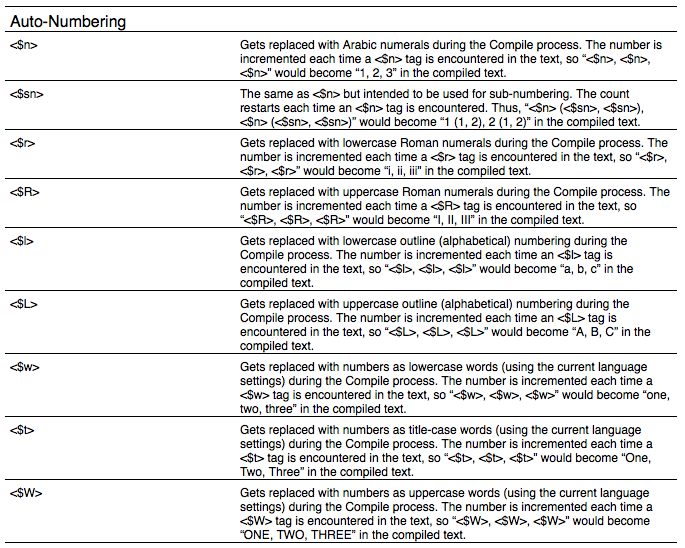
Lots to choose between!
Using your own titles, or not?
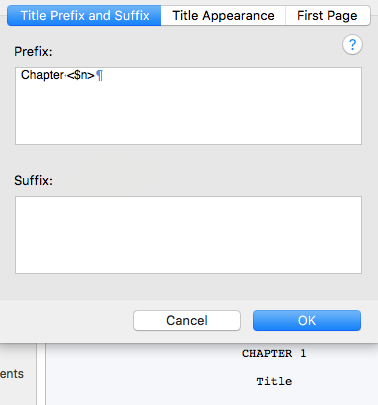 If I choose <$n>, a digit version of the chapter numbering is displayed.
Since my numbering might not be perfect (eg 1, 2a, 2b, 3, 4, …), I have the choice of using the automatic numbering and let Scrivener count the chapters for me. Phew!
I then have to decide about my titles. Do I dream up a title for each chapter, or not?
If I decide I do want my own titles (as well as the numbering, or instead of), I simply overwrite the folder titles in my Binder.
If I decide not to do this, to remove the default Title is easy: delete it from within the display area.
Equally easy is to remove the word ‘CHAPTER’ and just leave the number, or delete the default numbering option altogether.
Or, if you don’t want anything to appear at the head of each chapter, it’s simple: just untick the box in the Title column!
As I said at the start of this post: Scrivener offers so much flexibility and gives you so many options to choose between. In the next blog post, I’ll investigate how to control the appearance of the chapter title.
If you’d like to see a demonstration of any of the features discussed in this blog post, book a Simply Scrivener Special.
The ScrivenerVirgin blog is a journey of discovery:
a step-by-step exploration of how Scrivener can change how a writer writes.
To subscribe to this blog, click here.
Also … check out the Scrivener Tips
on my ScrivenerVirgin Facebook page.


Pingback:In praise of Scrivener
10 September 2024 at 14:02Eric
12 December 2023 at 19:23Hi. I have never been able to figure out how to get Scrivener to compile with chapters using my folder names instead of “Chapter one,” etc. I really can’t follow this blog post, or maybe it’s out-of-date with my version of Scrivener. But I still can’t make it compile with my own chapter titles.
There’s no “formatting” tab in compile now, that I can see. I have a “Formats” column, and that doesn’t have chapter names in yellow or anything like that.
Anne Rainbow
12 December 2023 at 20:03This post was written in 2017, ahead of the release of Scrivener 3. If you look at more recent posts, you’ll find the answer to your question. There is an Index of Scrivener Posts on my site at https://www.scrivenervirgin.com/index-scrivener-posts. Looking through, I note that I wrote an up-to-date version of how to process material in the Binder (including the chapter titles) here: https://www.scrivenervirgin.com/2021/06/scrivener-mindset-binder-text-output-options/. I hope this helps!
Roger Maxwell
29 December 2021 at 23:52Thank you for your great article. However, my issue is that I have written a book with a couple of chapters that are divided up in parts within the chapter. What I did while writing those chapters was I separated the parts with two spaces then the part number, then another space to begin the next part. I did this without much thinking about compiling this later. Is there a way for Scrivener to handle this?
Thanks for your help.
Roger
Anne Rainbow
30 December 2021 at 10:06Hi Roger. First, vertical spacing should never be managed by putting in extra line spaces. See this blog post for more info: https://www.scrivenervirgin.com/2019/01/scrivener-no-style-creating-white-space/ Second, any headings (or subheadings like your part numbers) should be in the Binder, not in the Editing Pane. See this blog post for more info: https://www.scrivenervirgin.com/2021/05/the-scrivener-mindset-nailing-the-binder-structure/ You can then control how you want those headings to look including the spacing before/after. You will also maybe need to create additional section types for the text that appears within your parts, if you want that material to be formatted differently from other text in other chapters. My guess is you are writing non-fiction and this blog post might also shed more light for you: https://www.scrivenervirgin.com/2020/12/non-fiction/ Hope this all helps! If you need more, check out my Simply Scrivener Special option: https://www.scrivenervirgin.com/simply-scrivener-specials/
Shonda Sinclair
19 November 2023 at 23:45Where do you just do the text writing? In the “section” square?
Anne Rainbow
20 November 2023 at 07:02By the ‘text writing’, do you mean the material within your chapter? If so, that goes in the Editing pane. Binder on the left; Editing pane in the middle; Inspector on the right. See https://www.scrivenervirgin.com/2018/02/writers-workspace/
Aneta
19 June 2020 at 12:19Bless you for changing titles in my Polish books !! I was furious where searching for option how to custom own chapters’ titles… Thank you !
Anne Rainbow
19 June 2020 at 14:38You are most welcome, Aneta!
Linda
1 March 2019 at 00:51Oh my gosh! Why didn’t I come across your article two days ago!!!
Now, I can get the darn chapter name issue off my mind all day. Thank you so much for sharing your knowledge. I’ll surely check out your other articles.
Jackie
26 January 2019 at 02:21Thank you for this! I do have one question, however. If I’m writing using a preface/prologue/introductory matter that I *don’t* wanted included as a formal chapter, how to I “turn off” the settings for this? For instance, right now when I compile I’m getting my prologue as “Chapter 1.” I’ve already fixed it so that it at least says “prologue” instead of chapter 1, already, thank you for your advice above in that case. However for the rest of my chapters it is assuming the prologue is STILL Chapter 1, and so my actual chapter 1 is chapter 2, my chapter 2 is labeled chapter 3 and etc. Any ideas? Thank you!
Anne Rainbow
7 February 2019 at 07:14Your question was answered in the Simply Scrivener Special on 29 January. https://www.scrivenervirgin.com/simply-scrivener-special-recordings/ Access to recordings are available to those who registered to attend, and Visitor members of RedPen (which is free). Become a visitor here: https://www.scrivenervirgin.com/redpen/
Angelika
20 August 2018 at 21:10Thank you! It’s been driving me mad trying to get rid of that “CHAPTER 1” thing in front of each scene, and couldn’t find the info anywhere. You’ve saved my sanity. 🙂